craft a wooden jewelry box
Embarking on the journey to create a wooden jewelry box is a fantastic way to refine your woodworking skills while producing a functional and aesthetically pleasing item. This detailed guide provides step-by-step instructions, ensuring a rewarding experience and a beautiful end product.
Required Materials and Tools
- Wood: Choose durable hardwood like oak, maple, or cherry.
- Hinges and Latch: High-quality hardware for functionality.
- Sandpaper: Various grits (coarse to fine).
- Wood Glue: For assembling the box.
- Finish: Oil, varnish, or lacquer.
- Tools: Saw, chisel, drill, clamps, ruler or tape measure.
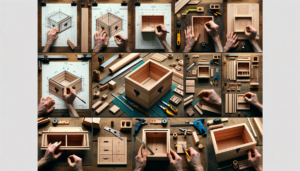
Step-by-Step Construction Process
Step 1: Design and Planning
- Sketch Your Design: Create a detailed drawing, noting dimensions and compartment arrangements.
- Wood Selection: Pick wood based on grain and color preferences.
Step 2: Cutting the Wood
- Measuring and Marking: Accurately mark your wood for cutting.
- Sawing: Carefully cut out the sides, top, bottom, and dividers.
Step 3: Assembling the Box
- Dry Fit First: Assemble the pieces without glue to check the fit.
- Gluing: Apply wood glue and use clamps to hold the pieces while the glue dries.
- Attaching the Lid: Securely fix the lid to the box using hinges.
Step 4: Sanding and Finishing
- Sanding: Progressively sand the box starting with a coarse grit and moving to finer grits.
- Applying Finish: Select and evenly apply your chosen finish for protection and sheen.
Step 5: Final Touches
- Installing Hardware: Attach the latch and any additional hardware.
- Lining: Optionally, line the box with felt or velvet for a luxurious touch.
Helpful Tips for Success
- Accuracy is Crucial: Double-check measurements before cutting.
- Patience in Sanding: Take your time to achieve a smooth finish.
- Applying Finish: Apply in a dust-free environment for the best results.
FAQs
- What is the best wood for a jewelry box? Hardwoods like oak, maple, or cherry are ideal due to their durability and appearance.
- How can I customize the inside of the box? Design the interior layout to suit specific jewelry types, incorporating dividers and linings as needed.
- How do I achieve a professional finish? Sand thoroughly and apply the finish in thin, even coats, allowing adequate drying time between coats.
Conclusion
Building a wooden jewelry box is a fulfilling project that enhances both your workspace and your woodworking skills. With patience, precision, and creativity, you can craft a stunning piece that serves as both a functional item and a testament to your craftsmanship.
Additional Resources
- Selecting the Right Wood for Your Project
- Fundamental Woodworking Techniques
- Achieving the Perfect Wood Finish
Embarking on this woodworking project not only challenges your skills but also results in a beautiful and practical piece. Remember, the journey is as important as the destination. Enjoy the process of creating something unique and personal. Happy woodworking!