Building Wooden Signs
Creating wooden signs is a rewarding and creative woodworking project. Whether for home décor, business, or gifts, wooden signs add a personal touch to any space. This guide is tailored for intermediate woodworkers, covering everything from material selection to finishing techniques.
Materials and Tools Required
- Wood: Pine, cedar, or reclaimed wood for a rustic look.
- Sandpaper: Various grits for smoothing the wood.
- Paint or Stain: For lettering and background color.
- Sealant: To protect the finished sign.
- Carving Tools: For detailed lettering and designs.
- Saw: To cut the wood to size.
- Router (optional): For creating raised letters or borders.
- Clamps, Tape Measure, Pencil.
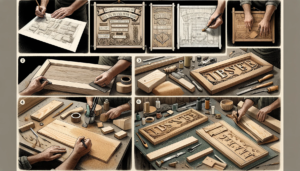
Step-by-Step Guide to Building Wooden Signs
Step 1: Designing Your Sign
- Conceptualize the Design: Decide on the text, font style, and any decorative elements.
- Sketch the Layout: Create a detailed sketch with dimensions and placement.
Step 2: Preparing the Wood
- Select and Cut Wood: Choose your wood type and cut it to the desired size.
- Sanding: Sand the wood surface smoothly, starting with a coarse grit and finishing with a fine grit.
Step 3: Transferring the Design
- Stencil or Freehand: Transfer your design onto the wood using a stencil or drawing freehand.
- Routing or Carving: Use a router for raised letters or a carving tool for recessed letters.
Step 4: Painting and Detailing
- Painting: Carefully paint the letters and designs. Use tape for clean edges if needed.
- Distressing (optional): For a rustic look, lightly sand the painted areas.
Step 5: Finishing the Sign
- Sealing: Apply a sealant to protect the sign from weather and wear.
- Hanging Mechanism: Add hooks or a wire on the back for hanging.
Tips for a Successful Project
- Wood Choice: Choose wood that complements the sign’s intended use and location.
- Practice Carving: If new to carving or routing, practice on scrap wood first.
- Attention to Detail: Take your time with painting for a professional look.
FAQs
- What’s the best wood for outdoor signs? Cedar or treated pine is ideal for outdoor durability.
- How do I create raised letters? Use a router with a suitable bit to carve around the letters, leaving them raised.
- Can I make a sign without power tools? Absolutely, you can hand-paint or use carving tools for the letters.
Conclusion
Building wooden signs is a creative process that allows for personal expression and craftsmanship. Whether you’re making a sign for your home, as a gift, or for a business, the process is both enjoyable and rewarding.
Additional Resources
Crafting wooden signs is not just about creating an item but about expressing your creativity and skill. Each sign you make will be unique, adding character and warmth wherever it’s displayed. Happy woodworking!